Pixel Sharp Graphics at Multiple Screen Resolutions
- Posted by Francesco
- 9 Min. read
- 0 Comments
Pixel art can be very picky when it comes to being scaled as it easily loses its pixel-perfect look, becoming blurry and distorted. This creates an interesting technical challenge for pixel art games since they are drawn at a fixed native resolution, but need to adapt to a wide variety of screen resolutions and aspect ratios.

A Modern Problem
The old gaming consoles – where pixel art was born – would always output video data at only one resolution, regardless of the CRT monitors and TVs they were plugged to. This inevitably led to distorted and blurred graphics, which were made worse by the artefacts generated by the way cathode tubes and video standards worked. At the end of the day, what players saw on the screen looked nothing like the original pixel art and developers could do nothing about it.

Yet today most players expect pixel art to look crisp and sharp regardless of whether they’re using the latest 4K OLED TV or an old 4∶3 LCD screen. In this post we’re going to take a look at how we handled this problem in Guntastic.
Assessing the Situation
During pre-production we investigated which screen resolutions players actually used to get a better idea of the problem scale. While it was quite safe to assume home consoles worked at standard 16∶9 resolutions such as 720p and 1080p (and now 2160p), the situation on PC was far more complex:
| Screen Resolution | Aspect Ratio | Adoption |
|---|---|---|
| 1920×1080 (FHD) | 16∶9 | 38.21% |
| 1366×768 (WXGA) | ∼16∶9 | 24.76% |
| 1600×900 | 16∶9 | 6.05% |
| 1440×900 | 16∶10 | 4.59% |
| 1536×864 | 16∶9 | 4.48% |
| 1280×1024 (SXGA) | 4∶3 | 4.08% |
| 1680×1050 | 16∶10 | 3.62% |
| 1360×768 | ∼16∶9 | 2.89% |
By looking at the data above we observed that:
- Perhaps unsurprisingly 16∶9 was the more common aspect ratio, with the standard 1920×1080 resolution which was used on more than 38% of PCs (with Steam installed, that’s it).
- There are some awkward screen resolutions out there, with queer 16∶9-like aspect ratios, or perfect 16∶9 aspect ratios but uneven sizes.
- More than 7% of users had 16∶10 screens.
- Screens with a 4∶3 aspect ratio still existed, although had a shrinking a small market share.
Remember, the data above is from December 2016. Had we started working on the game today, we would have found a radically different scenario: 1080p is used on more than 60% of PCs, while non-HD resolutions (which were predominantly used on laptops) and 4∶3 screens have declined sharply.
A Starting Point
As standard 16∶9 HD resolutions were already the de-facto target to develop for, we decided to use a reference resolution of 640×360 pixels. A canvas of this size scales perfectly using integer factors to all HD resolutions: 2× for 1280×720, 3× for 1920×1080 and so on, including 4K, 8K and possibly more (although I can’t imagine what a pixel art game would look on such screens!). We’ve already seen in a previous post that 640×360 proved to be the most viable option from a gameplay point of view as well.
Our initial implementation of the scaling mechanism was quite standard, and worked by changing the orthographic size of the game camera based on the detected screen resolution. A very good introduction to this technique can be found in the Pixel Perfect 2D post on the Unity blog, which also provides example code that can be easily ported over to UE4.
Thick Borders to the Rescue
To prevent distortions and blurriness at the remaining screen resolutions we identified a simple solution in a slightly modified version of the “Thick Borders” technique outlined in the same blog post.
Basically, the idea is to scale the game to the nearest whole multiple of the reference resolution and then show or hide a small portion of the game world to the sides of the screen to compensate for the small difference in screen resolution. This proved to work well especially on 16∶9-like aspect ratios displays that have resolutions that only differs marginally from standard 16∶9 HD resolutions (e.g. 1366×768, 1360×768, etc.).
To support this technique we had to change how the final scaling factor is calculated: if it’s near to the next integer, we round it up, even if we’ll lose a bit of the world to the sides; otherwise we round it down, so thick borders will fill the rest of the screen. The final implementation lives inside our PlayerCameraManager class and takes approximately 80 lines of code. A simplified version is presented below:
// The native resolution of the pixel art
const FVector2D ReferenceResolution(640.0f, 360.0f);

// The pixels per unit (translation factor from pixels to world units, in our case 24px (a tile) = 100cm)
const float ReferencePixelsPerUnit = 0.24f;

void AFolliesPlayerCameraManager::UpdateCameraWidth(FMinimalViewInfo& OutCameraView)
{
    if (GEngine == nullptr)
    {
        return;
    }

    const UGameViewportClient* GameViewport = GEngine->GameViewportForWorld(GetWorld());
    if (GameViewport != nullptr && GameViewport->Viewport != nullptr)
    {
        // Get the viewport size
        const FVector2D ViewportSize(GameViewport->Viewport->GetSizeXY());

        // Calculate the new orthographic width based on pixel art scale and viewport size
        OutCameraView.OrthoWidth = (ViewportSize.X / ReferencePixelsPerUnit) / GetPixelArtScale(ViewportSize);
    }
}

float AFolliesPlayerCameraManager::GetPixelArtScale(const FVector2D& InViewportSize)
{
    // Calculate the new art scale factor
    float BasePixelArtScale = (InViewportSize.X / ReferenceResolution.X);

    // Round it up or down
    BasePixelArtScale = (FMath::Frac(BasePixelArtScale) > 0.9f) ? FMath::CeilToFloat(BasePixelArtScale) : FMath::FloorToFloat(BasePixelArtScale);

    // In the extremely rare case where the display resolution is lower than the reference resolution we
    // also need to protect against divisions by zero, although in this case the game will be unplayable :)
    BasePixelArtScale = FMath::Max(1.0f, BasePixelArtScale);

    return BasePixelArtScale;
}
While thick borders won’t work well for some games since they would inevitably affect gameplay by changing the portion of the world that is visible to the player, they worked quite well for us. In Guntastic every level need to be completely self-contained to fit on a single screen, and having additional room to spare to the sides even gave us a chance to fill these areas with additional details. As an additional precaution, we also established a safe area of one tile around every level that can be hidden, without affecting gameplay, in the very rare cases where the scaling factor is rounded up instead of down.
Handling Out of Gauge Screens: Letterboxing
Although thick borders did the trick in most cases, they failed to handle situations where the area to cover to the sides was way too big, in example with some 4∶3 screens and uneven resolutions such as 1600×900. Since these screens were not widespread we decided to solve the problem by applying a simple letterboxing effect. This also served as a failsafe solution in case a player is using a very strange resolution we didn’t directly account for.

We initially tried to apply the letterboxing effect through the built-in vignette post processing filter, but it proved difficult to control and integrated badly with the pixelated look of the rest of the game. Currently, the effect is implemented inside the game world by using a simple rectangular static mesh, with a big central hole that helps keeping overdraw to a minimum. Not the cleanest approach, but it gets the job done!
The Final Result
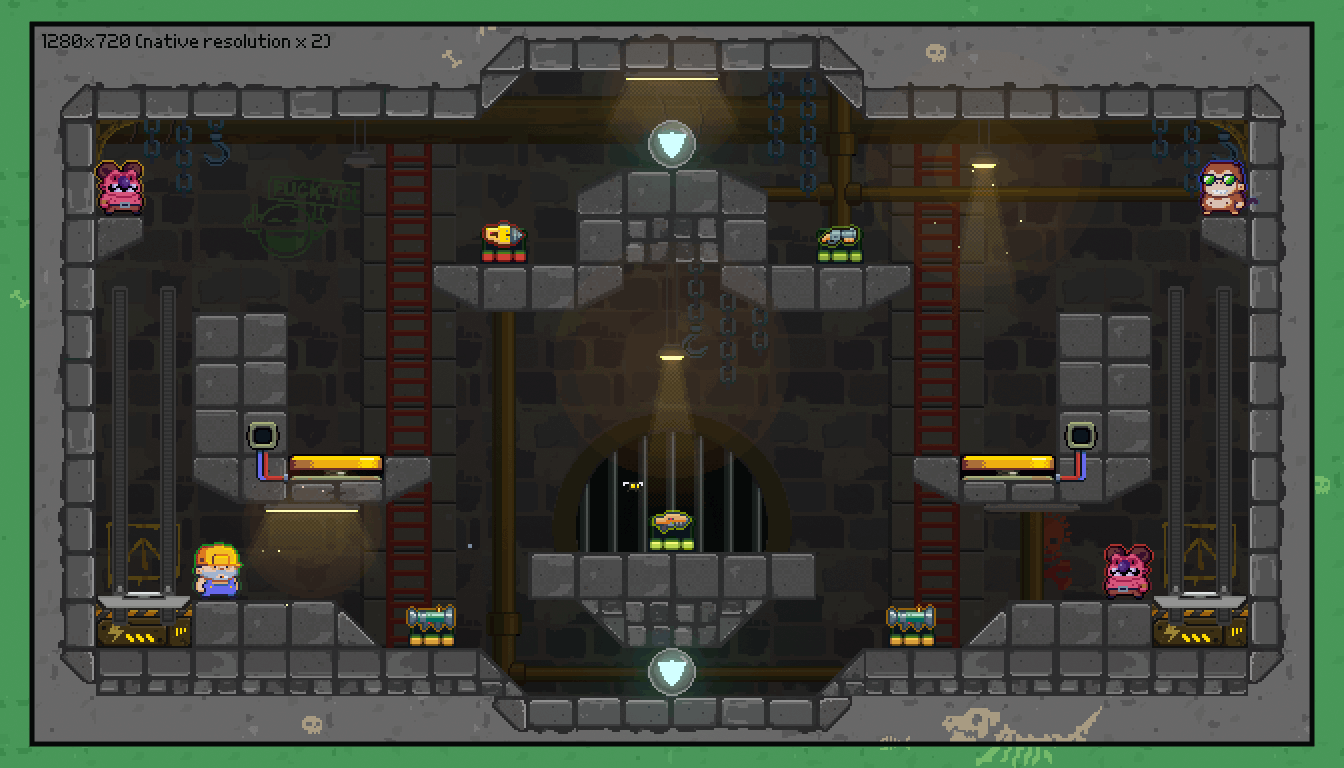
In the end, every level in Guntastic is composed of 34×24 tiles. The playable area only accounts for 24×16 of them (which is approximately our native resolution of 640×360 pixels), with the rest being there only to support the thick borders and letterboxing techniques. The following table and figure show which scaling factor and techniques are applied at common resolutions:
| Screen Resolution | Scaling Factor | Visible Techniques |
|---|---|---|
| 1920×1080 (FHD) | 3 | None |
| 1366×768 (WXGA) | 2.1 ⇒ 2 | Thick Borders |
| 1600×900 | 2.5 ⇒ 2 | Thick Borders, Letterboxing |
| 1440×900 | 2.3 ⇒ 2 | Thick Borders, Letterboxing |
| 1536×864 | 2.4 ⇒ 2 | Thick Borders, Letterboxing |
| 1280×1024 (SXGA) | 2 | Thick Borders, Letterboxing |
| 1680×1050 | 2.6 ⇒ 2 | Thick Borders, Letterboxing |
| 1360×768 | 2.1 ⇒ 2 | Thick Borders |

- Green: 1× scaling factor.
- Blue: 2× scaling factor.
- Yellow: 3× scaling factor.
Conclusion
In this post I presented the solution we adopted to support multiple screen resolutions in Guntastic, which is a mix of three different techniques: scaling, thick borders and letterboxing. While definitely not perfect, this approach was quite simple to implement while remaining – we hope – future proof and flexible enough to handle even niche resolutions.